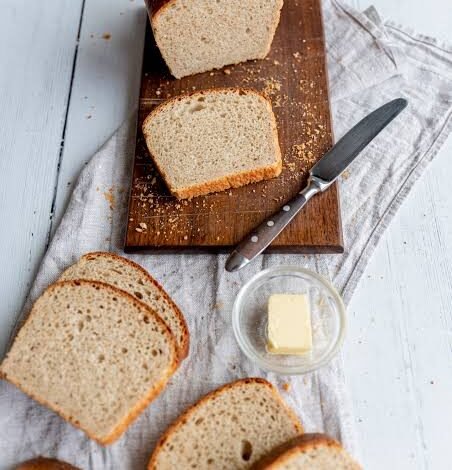
Sourdough discard sandwich bread is a wonderful homemade loaf that brings together the soft texture of traditional white bread with the gentle tang of real sourdough. Many people who keep a starter culture in their kitchen know the daily struggle of throwing away extra starter during feeds. This recipe solves that problem by turning your leftover starter into a tender loaf that works perfectly for morning toast, school lunches, or classic sandwiches. The dough combines simple ingredients like flour, milk, butter, and a tiny amount of baker yeast to ensure a reliable rise while your sourdough discard provides a deep depth of flavor. Every slice features a golden crust and a pillow soft interior that stays moist for days without crumbling apart when you spread cold butter across it.
Home bakers absolutely love this recipe because it takes the fear out of working with sourdough while delivering consistent and foolproof results every single time. Traditional sourdough recipes can require long waiting periods, complex folding routines, and unpredictable fermentation times that depend heavily on kitchen temperature. By adding a small amount of yeast alongside your sourdough discard, you gain the benefit of a quick and predictable baking schedule without losing the incredible flavor profiles of fermented dough. Beginner bakers find great comfort in this approach because it builds confidence in handling dough while ensuring a high successful loaf. The resulting loaf slices smoothly without tearing, making it an instant family favorite for kids and adults who prefer soft sandwich bread over hard crusts.
Baking your own sandwich bread at home provides a powerful feeling of emotional satisfaction and physical connection to the food you put on the table. The smell of fresh bread baking in your warm oven fills every room with an inviting aroma that creates instant feelings of comfort, security, and nostalgia. From a wellness perspective, making your bread gives you complete control over the quality of your ingredients, allowing you to bypass unnecessary artificial preservatives, emulsifiers, and high fructose corn syrup found in commercial store options. Knowing exactly what goes into your daily bread gives peace of mind to parents and health conscious individuals who want clean simple nutrition. Taking time out of a busy weekend to knead dough serves as a peaceful grounding routine that rewards your efforts with a wholesome staple food.
This versatile recipe adapts easily to different daily needs and personal lifestyles, making it an essential skill for any modern kitchen enthusiast. Whether you want to stretch your grocery budget by reducing food waste or simply desire a cleaner sandwich option for your family, this loaf fits seamlessly into your weekly routine. You do not need expensive specialized equipment like proofing baskets or dutch ovens to achieve a bakery quality loaf right at home. A simple standard loaf pan, a mixing bowl, and your own two hands are all you need to transform basic pantry staples into something truly extraordinary. As you get comfortable with the process, baking this bread turns from a novel kitchen project into a cherished weekly ritual that nourishes your home.
Ingredients You Will Need
To bake one full loaf of sourdough discard sandwich bread, gather the following ingredients:
-
All purpose flour or bread flour: 4 cups or 480 grams
-
Warm whole milk or water: 1 cup or 240 milliliters
-
Sourdough discard unfed at room temperature: 1 cup or 240 grams
-
Unsalted butter melted and cooled: 3 tablespoons or 42 grams
-
Honey or granulated white sugar: 2 tablespoons or 42 grams
-
Instant yeast or active dry yeast: 2 and 1/4 teaspoons or 7 grams
-
Fine sea salt or table salt: 1 and 1/2 teaspoons or 9 grams
For brushing on top of the loaf:
-
Melted butter: 1 tablespoon or 14 grams
Step by Step Method
Preparing Your Liquids and Yeast
Start by warming your milk or water in a small pan or microwave until it reaches a warm temperature around 100 degrees Fahrenheit or 38 degrees Celsius. Liquid that is too hot will kill your yeast, so make sure it feels comfortable on your skin. Pour the warm liquid into a large mixing bowl, then stir in your honey and instant yeast. Let the mixture sit undisturbed for five minutes until it turns bubbly and frothy on top, showing that the yeast is active and ready to work.
Combining the Wet Ingredients
Once your yeast mixture is frothy, pour in your room temperature sourdough discard and three tablespoons of melted butter. Use a wooden spoon or a whisk to gently stir everything together until the discard dissolves into the liquid and you have a smooth milky mixture. Stirring thoroughly at this point ensures the flavor of the discard spreads evenly throughout the finished dough.
Adding Flour and Mixing the Dough
Add your flour and salt into the wet mixture bowl. Stir with a sturdy spoon until a shaggy dough begins to form and no dry pockets of flour remain visible. If the dough feels overly sticky and wet to manage, add one extra tablespoon of flour at a time. If it seems too dry and stiff, add a teaspoon of warm water until the dough pulls together into a rough ball.
Kneading to Build Structure
Turn the dough out onto a lightly floured clean countertop. Knead the dough with your hands for eight to ten minutes by pushing it forward with the heel of your hand, folding it back over itself, and turning it slightly. Continue this rhythmic movement until the dough feels smooth, stretchy, and elastic under your fingers. You can check if it is ready by gently pressing a finger into the surface; if the dough springs back slowly, it is kneaded enough.
The First Rise Period
Lightly oil a clean large bowl with a few drops of neutral oil. Place your smooth dough ball into the oiled bowl, turning it over once so the surface gets a thin coat of oil. Cover the top of the bowl tightly with a clean kitchen towel or plastic wrap to keep the dough from drying out. Place the bowl in a warm draft free spot in your kitchen for about one to one and a half hours, or until the dough doubles in physical size.
Shaping the Loaf
Gently press down on the risen dough with your fist to release large air bubbles. Transfer the dough onto your clean countertop without adding extra flour. Flatten the dough with your hands into a wide flat rectangle shape that measures about eight inches by twelve inches. Roll the dough up tightly starting from the short edge to create a tight log shape. Pinch the long seam at the bottom firmly closed using your fingers so the roll does not unravel.
The Second Rise Period
Grease a standard eight by four inch loaf pan generously with butter or non stick baking spray. Place your shaped dough log into the prepared pan with the pinched seam facing down toward the bottom. Cover the loaf pan loosely with a light kitchen towel and let it rise in a warm place for about forty five to sixty minutes. The loaf is ready to bake when the top rises about one inch above the rim of the pan.
Baking the Sandwich Bread
Preheat your oven to 350 degrees Fahrenheit or 175 degrees Celsius while the bread finishes rising. Place the loaf pan onto the middle rack of your heated oven. Bake for thirty five to forty minutes until the top crust turns a deep golden color and the loaf sounds hollow when you tap the top gently with your knuckles. If the top brown color darkens too fast midway through baking, lay a sheet of aluminum foil loosely over the top without pressing down.
Cooling and Slicing
Remove the loaf from the oven and immediately brush the top crust with one tablespoon of melted butter to keep the surface soft and glossy. Allow the bread to sit inside the warm metal pan for ten minutes. Afterward, carefully slide the bread out of the pan onto a wire cooling rack. Let the loaf cool completely for at least one to two hours before slicing with a serrated knife, as slicing hot bread causes the internal crumb to become gummy.
Why This Recipe Is Special
This recipe offers a perfect bridge between classic long fermentation baking and convenient everyday home cooking. Sourdough discard adds rich complex taste notes that store bought commercial yeast breads simply cannot replicate on their own. The mild acidity from the fermented starter breaks down proteins gently, resulting in a soft texture that holds up well during slicing and spreading.
From a health standpoint, homemade sourdough discard bread contains simple clean ingredients without chemical conditioning agents, synthetic shelf extenders, or hidden sugars. The fermentation process of the discard helps break down some phytic acid present in grains, which can assist your body in absorbing minerals like iron and zinc more efficiently.
The inclusion of milk and butter enriches the dough with healthy fats and protein, keeping the interior tender for up to four days at room temperature. This recipe delivers a satisfying balance of whole food comfort, practical resourcefulness, and superior natural flavor for your daily meals.
Extra Tips for Better Taste
-
Brush the hot loaf with honey butter instead of plain butter right after baking to add a subtle hint of sweetness to the top crust.
-
Substitute up to one cup of the white flour with whole wheat flour if you want a nuttier flavor profile and extra dietary fiber in your slice.
-
Use bread flour instead of all purpose flour to achieve a higher rise and a slightly chewier texture in the middle of your loaf.
-
Maintain a warm proofing spot by placing your dough bowl inside an unheated oven with the interior oven light turned on.
-
Toast your bread slices in a pan with a small pat of real butter to bring out the deep caramelized notes of the fermented sourdough.
-
Store your fully cooled bread in a reusable cotton bag or a specialized bread box to preserve the soft crust without creating unwanted moisture buildup.
-
Freeze pre sliced portions in a sealed freezer bag for up to two months so you can pop individual slices straight into the toaster whenever needed.
Final Thoughts
Baking a fresh loaf of sourdough discard sandwich bread brings immense joy, comforting smells, and healthy food straight into your home. It feels wonderful to watch simple everyday pantry items transform into a soft golden loaf through basic mixing and patient rising. Sharing a warm slice with family members during breakfast creates peaceful lasting kitchen memories that highlight the beauty of slow homemade living. Keep practicing your dough handling skills, enjoy the process, and take pride in serving wholesome homemade bread to the people you love most.
Nutrition Details
Here is the estimated nutrition information for one serving of this sourdough discard sandwich bread, based on a single slice from a twelve slice loaf:
| Nutrient | Amount Per Serving |
| Calories | 185 kcal |
| Total Fat | 4.5 grams |
| Saturated Fat | 2.5 grams |
| Trans Fat | 0 grams |
| Cholesterol | 10 milligrams |
| Sodium | 300 milligrams |
| Total Carbohydrate | 30 grams |
| Dietary Fiber | 1.2 grams |
| Total Sugars | 2.5 grams |
| Protein | 5 grams |
| Calcium | 35 milligrams |
| Iron | 1.8 milligrams |
| Potassium | 65 milligrams |
Disclaimer
Please remember that human health and individual nutritional needs vary from person to person. The nutrition estimates listed above are intended for basic educational purposes and may vary based on exact ingredient brands or cooking adjustments you choose to make. If you have specific dietary restrictions, gluten intolerances, or personal medical concerns, please consult a certified doctor or registered dietitian for tailored advice before changing your routine.