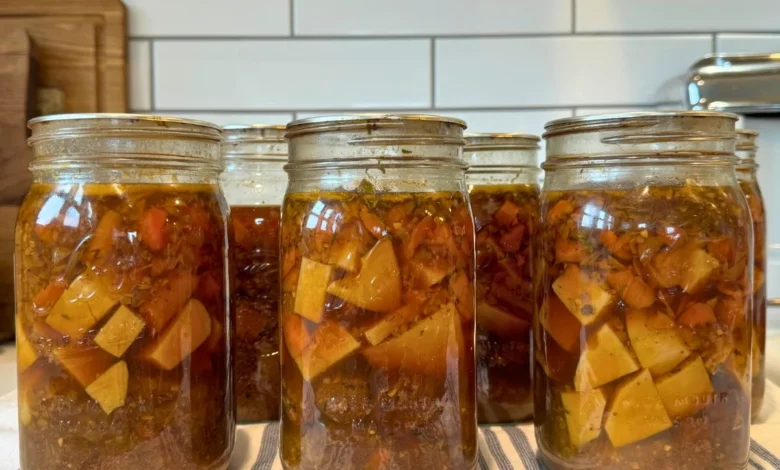
Canning beef stew at home is one of the most rewarding and practical culinary traditions that you can learn to master in your own kitchen. This age old method allows you to preserve fresh beef, wholesome vegetables, and aromatic spices inside glass jars for long term storage without needing any refrigeration. By learning how to safely pressure can your own homemade stew, you transform simple raw ingredients into convenient ready to eat meals that sit patiently on your pantry shelves. There is something deeply satisfying about looking at a collection of sparkling jars filled with rich brown broth, tender chunks of meat, bright orange carrots, and soft potatoes that you prepared with your own hands.
People across generations absolutely adore home canned beef stew because it brings unmatched convenience, rich flavor, and absolute comfort to everyday meal planning. On those hectic weeknights when you feel far too exhausted to cook a meal from scratch, having a jar of home preserved stew means dinner is only five minutes away. Unlike commercial canned soups found in grocery stores, your homemade version contains no mystery additives, artificial thickeners, or absurdly high levels of sodium. The pressure canning process breaks down tough cuts of meat over time, resulting in incredibly tender bites that absorb all the deep herbal flavors from the surrounding broth, making every single spoon full taste like a slow cooked Sunday dinner.
Preparing a large batch of canned beef stew brings a wonderful sense of emotional comfort, self reliance, and healthy eating to your household routine. Filling your pantry with hearty preserved food gives you peace of mind knowing that your family has access to wholesome nourishment during emergency situations, power outages, or busy seasonal shifts. From a health and fitness perspective, this recipe allows you to fuel your body with clean protein, essential vitamins, and nutrient dense vegetables without relying on takeaway food or processed convenience snacks. Gathering fresh ingredients from local markets or your garden and turning them into long lasting meals connects you directly to the food you eat, building confidence and pride in your self sufficient lifestyle.
Whether you are an experienced home gardener looking to preserve your seasonal harvest or a curious beginner taking your very first steps into food preservation, this recipe guides you safely through the entire process. You do not need to feel intimidated by pressure canning equipment as long as you follow tested safety guidelines and clear instructions step by step. The simple English directions provided here break down every phase of preparation so that anyone can achieve delicious and safe results right at home. Once you experience the convenience of popping open a jar of rich homemade beef stew on a cold evening, this essential kitchen skill will quickly become a cherished part of your family routine.
Ingredients You Will Need
To prepare a full batch of six quart jars or twelve pint jars of canned beef stew, gather the following fresh ingredients:
-
Lean beef roast such as chuck roast, round steak, or stew meat cut into one inch cubes: 5 pounds or 2.25 kilograms
-
Fresh potatoes peeled and cut into one inch chunks: 4 cups or 600 grams
-
Fresh carrots peeled and sliced into thick coins: 4 cups or 500 grams
-
Yellow onions chopped into medium pieces: 2 large onions or 300 grams
-
Celery stalks sliced into thick pieces: 2 cups or 250 grams
-
Beef broth or unsalted beef stock: 8 cups or 2 liters
-
Salt or canning salt: 1 teaspoon per quart jar or 1/2 teaspoon per pint jar
-
Black pepper finely ground: 1 teaspoon or 2 grams
-
Dried thyme leaves: 1 teaspoon or 2 grams
-
Dried rosemary crushed: 1 teaspoon or 2 grams
-
Garlic cloves minced: 4 cloves or 12 grams
-
Worcestershire sauce: 2 tablespoons or 30 milliliters
-
Olive oil for browning meat: 2 tablespoons or 30 milliliters
Step by Step Method
Step 1: Cleaning and Preparing Your Canning Equipment
Begin by thoroughly washing your glass canning jars, metal bands, and new lids in warm soapy water, then rinse them completely with clean water. Inspect every jar carefully to ensure there are no cracks, chips, or rough edges around the rims that could prevent a proper seal. Keep your clean jars warm by placing them in a large pot filled with hot water or inside a warm dishwasher until you are ready to fill them. Prepare your pressure canner by adding two to three inches of clean water to the bottom according to your specific canner manufacturer guidelines and begin heating it on low.
Step 2: Preparing Meat and Vegetables
Wash all of your fresh vegetables thoroughly under cool running water before peeling and chopping them into uniform pieces. Cut your lean beef chuck roast into one inch cubes, making sure to trim away any excess thick fat because heavy fat can interfere with the jar sealing process later. Keeping your meat and vegetable pieces roughly the same size ensures that everything cooks evenly inside the pressure canner. Place your prepped potatoes, carrots, onions, and celery into separate clean bowls so they are easy to access when assembling your jars.
Step 3: Browning the Beef Chunks
Heat two tablespoons of olive oil in a large heavy bottomed skillet over medium high heat on your stovetop. Add the cubed beef in small batches, making sure not to overcrowd the pan so the meat browns properly instead of steaming. Sear the beef pieces for about three to four minutes until they develop a nice golden brown crust on the outside, leaving the centers undercooked. Transfer the browned meat to a large bowl and pour in two tablespoons of Worcestershire sauce, tossing the meat gently so it absorbs the savory liquid.
Step 4: Making the Warm Seasoned Broth
In a large stockpot, bring eight cups of beef stock or broth to a gentle simmer over medium heat. Add your minced garlic, dried thyme, dried rosemary, and black pepper directly into the simmering broth, stirring well to distribute the spices evenly. Keep this aromatic broth warm over low heat while you begin packing your jars so that hot broth goes into hot jars, preventing thermal shock that could break the glass.
Step 5: Packing the Jars
Carefully remove your warm jars from their hot water bath using a sturdy jar lifter tool and place them on a clean kitchen towel on your counter. Add canning salt directly to each empty jar, using half a teaspoon for pint jars or one full teaspoon for quart jars. Layer your ingredients into each jar, starting with browned beef, followed by chopped carrots, potatoes, celery, and onions, packing them loosely without pressing down too hard. Leave generous space near the top of the jar, filling the solid ingredients up to about one and a half inches below the top rim.
Step 6: Adding Hot Broth and Measuring Headspace
Ladle your hot seasoned beef broth over the packed meat and vegetables in each jar using a wide mouth funnel. Fill the liquid until it covers all the solid ingredients completely, leaving exactly one inch of empty space between the top of the liquid and the top rim of the jar. This empty area is known as headspace, and maintaining an exact one inch headspace is crucial for allowing air to escape properly and creating a strong vacuum seal during pressure processing.
Step 7: Removing Air Bubbles and Cleaning Rims
Insert a clean plastic bubble remover tool or a thin silicone spatula down into the sides of each filled jar, gently shifting the solid ingredients to release any trapped air bubbles. Recheck your one inch headspace after releasing bubbles and add a little extra hot broth if the liquid level dropped. Take a clean paper towel dampened with plain white vinegar and wipe the top glass rim of every jar thoroughly to remove any traces of grease, broth, or food residue that could ruin your seal. Place a flat canning lid centered on each clean jar rim and screw the metal band down until it is fingertip tight, meaning you turn it until you feel resistance without forcing it too tightly.
Step 8: Processing Jars in the Pressure Canner
Use your jar lifter to carefully transfer the filled jars into your preheated pressure canner, ensuring the jars sit upright on the bottom rack without touching each other directly. Fasten the canner lid securely in place according to your device instructions, leaving the steam vent pipe open without the weight placed on top. Turn your stovetop heat to high and allow steam to vent continuously from the pipe for ten full minutes to purge all trapped air from inside the canner chamber. After ten minutes of steady steam venting, place your pressure regulator weight onto the vent pipe or monitor your dial gauge until the canner reaches ten pounds of pressure, adjusting for your local altitude if you live higher than one thousand feet above sea level.
Step 9: Timing the Canning Process
Once your pressure canner reaches the correct ten pounds of pressure, start your timer immediately. Process pint jars for seventy five minutes or quart jars for ninety minutes, maintaining a steady heat source so the pressure level never drops below ten pounds. If the pressure drops below the required level at any point during the cycle, you must bring the pressure back up and restart the timing process completely from the beginning to ensure food safety.
Step 10: Cooling and Storing Your Preserved Stew
When your processing timer finishes, turn off the heat completely and allow the pressure canner to cool down naturally without disturbing it. Never try to force the canner to cool down faster by applying ice or lifting the pressure weight early, as sudden pressure shifts can cause liquid to boil out of your jars or crack the glass. Once the pressure gauge reads zero and the safety lock drops, carefully remove the lid, tilting it away from your face to avoid hot steam. Use your jar lifter to transfer the hot jars onto a towel lined countertop, leaving two inches of space between jars, and let them rest undisturbed for twelve to twenty four hours until they cool completely and you hear the satisfying ping sound of proper vacuum seals forming.
Why This Recipe Is Special
Home pressure canned beef stew stands out as a truly remarkable recipe because it combines traditional food preservation craftsmanship with incredible real world convenience for modern families. Unlike home canned acidic foods like tomatoes or pickles that can be processed in a simple boiling water bath, low acid foods like beef, potatoes, and carrots require the high heat of a pressure canner to safely destroy harmful bacteria spores. Mastering this process grants you complete control over your home food supply, allowing you to build a reliable pantry filled with delicious homemade ready to eat meals.
From a nutritional and health perspective, this stew recipe provides a balanced mix of high quality protein, complex carbohydrates, and essential dietary minerals. Lean beef delivers iron, zinc, and muscle building amino acids, while fresh root vegetables provide dietary fiber, potassium, and vitamins A and C. Cooking and preserving these ingredients inside sealed glass jars locks in their natural nutrients without requiring chemical additives, artificial flavors, or excess sodium commonly used in factory processing.
The culinary taste profile of pressure canned beef stew is extraordinarily deep and comforting. The high heat and sustained pressure inside the canner act like an accelerated slow cooker, forcing rich herbal flavors deep into the center of every beef chunk and vegetable. The meat becomes meltingly soft and tender, while the broth develops a thick savory body that warms you up completely from the inside out.
Extra Tips for Better Taste
-
Always choose lean cuts of beef with minimal intramuscular fat because heavy animal fat can float to the top of your jars, turn rancid over time, or soften the rubber seals on your canning lids.
-
Avoid using dairy products, flour, cornstarch, or pasta noodles inside your canning jars because thickeners trap heat unevenly during processing and prevent safe heat distribution.
-
To achieve a thick rich gravy when serving your stew later, simply open your preserved jar, pour the stew into a saucepan, bring it to a boil, and stir in a quick cornstarch slurry right before eating.
-
Add a dash of red wine or a splash of balsamic vinegar into your broth during the initial cooking phase to brighten the overall flavor profile with subtle acidity.
-
Sear your beef in small batches until it forms a deep brown crust on all sides to create rich caramelized flavors through the Maillard reaction before packing the meat into your jars.
-
Use raw packing or hot packing methods consistently according to tested guidelines without mixing up steps to ensure proper heating throughout the entire jar.
-
Store your fully cooled and sealed jars in a dark, cool, dry pantry without their metal screw bands attached so that you can easily spot any accidental seal failures over time.
Final Thoughts
Preserving your own homemade beef stew through pressure canning is an empowering kitchen project that rewards your efforts with rich taste and incredible convenience. Filling your home pantry with beautiful jars of tender beef, nutritious vegetables, and savory broth provides a comforting feeling of security and self sufficiency. Whether you serve this stew over fluffy mashed potatoes, egg noodles, or simply enjoy it with a slice of warm crusty bread, every jar offers a quick wholesome dinner crafted with love. Give this traditional preserving technique a try, and enjoy the delicious satisfaction of serving homemade meals straight from your pantry shelf.
Nutrition Details
Here is the estimated nutritional breakdown for one quart serving of home canned beef stew, based on a total batch yielding six full quart jars:
| Nutrient | Amount Per Quart Serving |
| Calories | 420 kcal |
| Total Fat | 12 grams |
| Saturated Fat | 4 grams |
| Trans Fat | 0 grams |
| Cholesterol | 85 milligrams |
| Sodium | 580 milligrams |
| Total Carbohydrate | 32 grams |
| Dietary Fiber | 5 grams |
| Total Sugars | 6 grams |
| Protein | 44 grams |
| Vitamin A | 180 percent daily value |
| Vitamin C | 25 percent daily value |
| Calcium | 60 milligrams |
| Iron | 4.5 milligrams |
| Potassium | 850 milligrams |
Disclaimer
Please keep in mind that individual nutritional needs, dietary restrictions, and health conditions differ for every person. The nutrition figures provided above are estimated calculations based on standard raw ingredient values and may vary depending on specific meat cuts or vegetable proportions used in your kitchen. Always follow tested pressure canning guidelines strictly to ensure proper food safety and prevent spoilage. If you have specific dietary concerns, metabolic conditions, or cardiovascular health considerations, please consult with a qualified physician or registered dietitian before making significant changes to your meal planning.