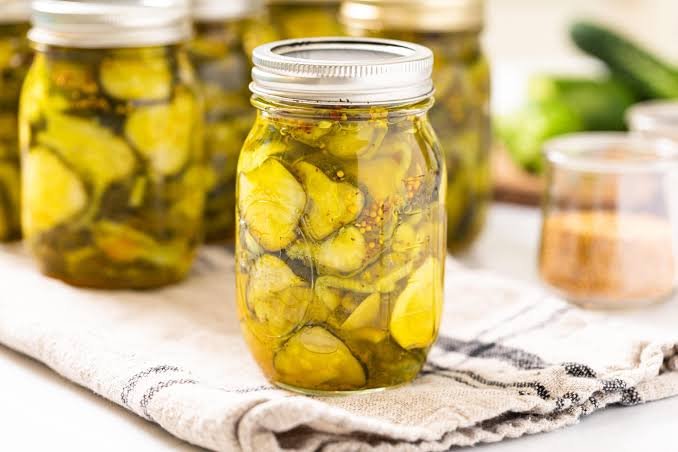
Canning bread and butter pickles at home is one of the most rewarding kitchen projects you can ever start, bringing the bright sunny flavors of summer right onto your pantry shelves for the entire year. This timeless preservation recipe turns fresh green cucumbers, sweet yellow onions, and crisp bell peppers into a mouthwatering condiment that balances sweet, tangy, and savory notes in every bite. When you open a sealed jar months after making it, you are instantly greeted by the wonderful aroma of mustard seeds, celery seeds, and warm spices soaked in a rich golden vinegar brine. Making your own batch allows you to step away from store bought options that often contain artificial dyes, excess sodium, or hidden chemical preservatives. Instead, you get to craft a pure homemade product that tastes remarkably better, holds a satisfying crunch, and fills your home with nostalgic kitchen warmth.
People across generations fall completely in love with bread and butter pickles because they offer an unforgettable flavor profile that bridges the gap between classic dill pickles and sweet relishes. The magic of this recipe lies in the delicate balance of sweetness from sugar paired with the sharp tangy kick of distilled white vinegar or apple cider vinegar. Every slice delivers a crisp texture that makes sandwiches, burgers, and simple snack platters come alive with vibrant taste. Unlike basic grocery store versions that can sometimes feel soft or overly sugary, home canned pickles retain a fresh farm stand quality that elevates simple everyday meals into something special. Gathering around a table with family and sharing a jar you canned yourself creates an immediate sense of pride and comfort that money simply cannot buy.
Baking, cooking, and preserving food at home carries a deep emotional appeal, connecting us to traditional methods of living while offering real health and fitness benefits. When summer gardens and local farmer markets overflow with an abundance of fresh pickling cucumbers, making a large batch of pickles prevents food waste while saving money on your grocery bills. From a nutrition standpoint, preparing your own canned vegetables lets you control the quality of every single ingredient, ensuring your family eats clean food made with natural spices and pure salt. Enjoying a few crunchy slices provides a low calorie snack that satisfies late night cravings for something sweet and salty without adding heavy fats or processed carbohydrates to your daily routine. The simple ritual of slicing fresh vegetables and listening to the satisfying pop of sealing jar lids brings a peaceful sense of accomplishment to your weekend.
Whether you are a seasoned home gardener looking to preserve a massive harvest or a curious beginner taking your very first steps into water bath canning, this straightforward guide makes the process completely stress free. You do not need expensive specialized machinery or expert culinary training to achieve perfectly safe and delicious results right in your home kitchen. All the necessary tools, such as glass mason jars, canning pots, and simple measuring spoons, are widely available and easy to handle. Following clear safety guidelines ensures your jars remain safely preserved for many months, giving you a steady supply of homemade treats to enjoy or gift to friends and neighbors. By the time your finished jars sit cooling on your counter, you will understand why this classic recipe remains a beloved staple in homes everywhere.
Ingredients You Will Need
To prepare the fresh vegetable mix, you will need the following items:
-
Pickling cucumbers sliced into thin rounds: 16 cups or about 4 pounds
-
Yellow onions sliced thinly into half moons: 2 large onions or about 4 cups
-
Pickling salt or non iodized canning salt: 1/2 cup or 150 grams
-
Crushed ice cubes: 4 cups or enough to cover the vegetables
To make the sweet and sour pickling brine, you will need the following items:
-
White distilled vinegar with 5 percent acidity: 3 cups or 710 milliliters
-
Apple cider vinegar with 5 percent acidity: 1 cup or 240 milliliters
-
Granulated white sugar: 3 cups or 600 grams
-
Brown sugar packed light: 1 cup or 200 grams
-
Yellow mustard seeds: 2 tablespoons or 22 grams
-
Celery seeds: 1 and 1/2 teaspoons or 5 grams
-
Whole mustard seeds or brown mustard seeds: 1 teaspoon or 3 grams
-
Ground turmeric: 1 teaspoon or 3 grams
-
Whole cloves: 1/2 teaspoon or 1 gram
Step by Step Method
Step 1: Washing and Slicing the Vegetables
Start by thoroughly washing your fresh pickling cucumbers under cold running water to remove any dirt or garden debris. Trim off a tiny slice from the blossom end of each cucumber, as the blossom end contains natural enzymes that can make your pickles soft over time. Slice the cucumbers into uniform rounds that are about one quarter inch thick using a sharp knife or a mandoline slicer. Slice your yellow onions thinly into gentle half moon shapes so they mix evenly with the cucumber rounds.
Step 2: Salting and Ice Soaking
Place all your sliced cucumbers and onions into a very large non reactive glass or stainless steel bowl. Pour one half cup of pickling salt evenly over the vegetables, gently tossing everything with your hands so every slice gets lightly coated. Cover the salted vegetables with four cups of crushed ice cubes or cold ice water. Let the bowl sit undisturbed at room temperature for three full hours. This crucial step draws out excess moisture from the cucumber walls, guaranteeing your finished pickles stay remarkably crisp after canning.
Step 3: Rinsing and Draining
After three hours have passed, drain the vegetables into a large colander in your sink to remove the melted ice water and accumulated salt. Rinse the cucumber and onion slices thoroughly under cold running water twice to wash away excess surface salt. Allow the vegetables to sit in the colander for ten to fifteen minutes so all extra water drains away completely.
Step 4: Preparing the Canning Equipment
While your vegetables are draining, prepare your water bath canner and glass jars. Wash six pint sized glass mason jars, along with their metal rings and new lids, in warm soapy water and rinse them thoroughly. Place the clean jars into a large water bath canning pot fitted with a bottom rack, fill the pot with water until the jars are covered, and heat the water to a gentle simmer. Keep your jars warm in the hot water until you are ready to fill them, which prevents the glass from cracking when hot brine is poured inside.
Step 5: Cooking the Pickling Brine
In a large stainless steel pot, combine three cups of white distilled vinegar, one cup of apple cider vinegar, three cups of white sugar, and one cup of brown sugar. Add two tablespoons of yellow mustard seeds, one and a half teaspoons of celery seeds, one teaspoon of brown mustard seeds, one teaspoon of ground turmeric, and half a teaspoon of whole cloves. Place the pot over medium high heat and bring the liquid to a full rolling boil, stirring continuously until all sugar crystals dissolve completely.
Step 6: Combining Vegetables and Brine
Carefully add your rinsed and drained cucumber and onion slices directly into the boiling brine pot. Stir the vegetables gently using a long wooden spoon so they are fully submerged in the hot liquid. Heat the mixture just until it reaches a low simmer, which takes about five to eight minutes. Do not let the vegetables boil vigorously or cook for too long, as overcooking will make the slices lose their firm crunch.
Step 7: Packing the Jars
Use a jar lifter tool to carefully remove one warm glass jar from your canning pot, pouring any excess hot water back into the pot. Place a wide mouth funnel onto the jar opening. Using a slotted spoon or tongs, pack the hot cucumber and onion slices tightly into the jar, leaving about half an inch of empty space at the top. Ladle the hot spiced brine over the vegetables, ensuring they are completely covered while maintaining that half inch headspace at the top rim.
Step 8: Removing Air Bubbles and Sealing
Slide a clean plastic utensil or wooden skewer down the inside edges of the jar to release any trapped air bubbles. Adjust the liquid level if needed by adding a small splash of hot brine to maintain the half inch headspace. Wipe the rim of the glass jar with a damp paper towel to clean away any sticky residue or spice particles. Center a clean metal lid onto the jar rim, screw the metal ring on until it is fingertip tight, and repeat the process for all remaining jars.
Step 9: Water Bath Processing
Lower your filled jars carefully into the hot water bath canning pot using your jar lifter. Ensure the water level sits at least one to two inches above the tops of the jars. Place the lid onto the canning pot and bring the water to a full rolling boil over high heat. Once the water boils rapidly, set a timer and process the pint jars for ten minutes. If you live at a high altitude above one thousand feet, increase your processing time according to standard altitude adjustment charts.
Step 10: Cooling and Storing
When the processing time finishes, turn off the heat and remove the lid from the canning pot. Let the jars rest in the hot water for five minutes to stabilize. Carefully lift the jars out of the pot without tilting them, and set them onto a thick kitchen towel placed on your counter. Allow the jars to cool undisturbed for twelve to twenty four hours. You will hear delightful popping sounds as the lids pull down and seal tightly. Test each seal by pressing the center of the lid; if it does not flex up and down, your jar is safely sealed and ready for long term storage in a cool dark pantry.
Why This Recipe Is Special
This homemade bread and butter pickle recipe holds a special place in culinary culture because it brings a perfect harmony of sweet and savory notes without relying on artificial colorings or thickeners. The brilliant yellow hue comes entirely from natural ground turmeric, which adds visual warmth to your pantry shelf while providing subtle earthy depth. Using a blend of both white distilled vinegar and apple cider vinegar creates a balanced acidity profile that preserves the vegetables safely while keeping the sharp vinegar taste pleasantly smooth on your tongue.
From a wellness perspective, making your own canned goods allows you to enjoy vegetables preserved at their peak freshness. Cucumbers are naturally hydrating and low in calories, while spices like turmeric, celery seed, and mustard seed contain natural plant compounds that promote overall digestion and comfort. Because you prepare these pickles using traditional fermentation free vinegar canning, you enjoy a clean product free from synthetic stabilizers or commercial anti caking agents.
The crunch factor in this recipe is exceptional due to the ice soaking method. Soaking cucumber rounds in salt and ice water firms up the natural pectin structure in the vegetable walls before heat is applied. This extra care ensures every single slice maintains a satisfying bite that contrasts beautifully with soft sandwich breads or rich grilled meats.
Extra Tips for Better Taste
-
Always select small to medium pickling cucumbers such as Kirby varieties because large slicing cucumbers have tough skins and watery seed pockets that make soft pickles.
-
Never skip trimming the blossom end of the cucumber because removing that tiny piece eliminates enzymes that soften the vegetable during storage.
-
Add a fresh grape leaf or a small pinch of pickle crisp calcium chloride to each jar before filling to guarantee an even firmer texture.
-
Use pure pickling salt or sea salt instead of table salt because regular table salt contains anti caking chemicals that can make your brine look cloudy.
-
Let your sealed jars rest in your pantry for at least two weeks before opening them so the spices fully infuse into the cucumber slices.
-
Feel free to add a few thin slices of fresh red bell pepper or a pinch of red pepper flakes into the brine for a colorful pop and mild spicy kick.
-
Store any jar that fails to seal properly in your refrigerator right away and enjoy those pickles within three weeks.
Final Thoughts
Canning your own bread and butter pickles is a wonderfully satisfying activity that fills your kitchen with joyous aromas and supplies your home with pure homemade goodness. It turns fresh simple vegetables into a memorable condiment that brings smiles to the dinner table every single time a jar is opened. Sharing a jar with loved ones makes for a thoughtful gift that displays care, effort, and traditional culinary craftsmanship. Give this straightforward recipe a try during the peak of cucumber season, and enjoy the delicious rewards all year long.
Nutrition Details
Here is the estimated nutrition information for one serving of homemade bread and butter pickles, based on a serving size of about one ounce or roughly three to four slices:
| Nutrient | Amount Per Serving |
| Calories | 35 kcal |
| Total Fat | 0 grams |
| Saturated Fat | 0 grams |
| Trans Fat | 0 grams |
| Cholesterol | 0 milligrams |
| Sodium | 160 milligrams |
| Total Carbohydrate | 8 grams |
| Dietary Fiber | 0.5 grams |
| Total Sugars | 7 grams |
| Protein | 0.5 grams |
| Vitamin C | 2 milligrams |
| Calcium | 15 milligrams |
| Iron | 0.3 milligrams |
| Potassium | 45 milligrams |
Disclaimer
Please keep in mind that individual nutritional requirements and dietary responses vary from person to person depending on overall health and activity levels. The nutritional values provided above are estimated calculations based on standard food database averages and can change based on exact ingredient brands or slicing sizes. If you follow a strict low sodium diet, manage diabetes, or have specific gastrointestinal health conditions, please consult a qualified healthcare professional or registered dietitian before incorporating new home canned foods into your daily meals.