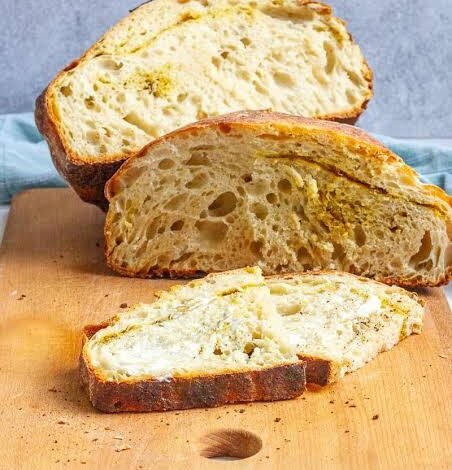
Sourdough garlic herb bread is a wonderful combination of traditional baking and rich flavors that can transform any simple meal into an absolute feast. This recipe takes the deep complexity of naturally fermented sourdough and pairs it with the warm comfort of roasted garlic and fresh fragrant herbs. When you bake this bread, your entire kitchen fills with an irresistible aroma that draws everyone straight to the oven door. The process relies on natural wild yeast rather than fast acting store bought packet yeast, which gives the loaf its famous open crumb texture, delicious chew, and bright sour tang. Adding garlic and garden fresh herbs right into the dough elevates every slice, making it far more exciting than standard white sandwich bread. Whether you are an experienced home baker looking for a fun new project or a complete beginner eager to experiment with sourdough starters, this recipe offers a rewarding baking adventure.
People all around the world fall in love with this specific bread because it hits every single sensory note you could ever want in a home baked loaf. The outer crust bakes up incredibly crispy and dark gold, crackling softly as it cools down on the wire rack, while the inside remains soft, airy, and gently pillowy. Every bite delivers a delightful contrast between that crunchy golden shell and the tender interior that is heavily infused with roasted garlic butter and savory green herbs like rosemary, thyme, and parsley. Unlike artificial garlic breads that rely on greasy pastes and heavy synthetic flavorings, this naturally fermented version has an authentic, honest taste that feels both luxurious and rustic. It satisfies your deep craving for comfort food without feeling overly heavy or processed, making it a favorite staple for family dinners, cozy weekends, and special holiday tables where warm food brings people together.
There are so many wonderful reasons and perfect moments to make a fresh loaf of sourdough garlic herb bread for the people you love. Emotionally, baking sourdough is a peaceful, grounding ritual that helps you slow down, practice patience, and disconnect from the fast pace of daily modern life. From a culinary perspective, this savory bread is the absolute best side dish to serve alongside steaming bowls of homemade rich tomato soup, hearty beef stews, or creamy pasta dishes where you need a good sturdy crust to scoop up every last drop of delicious sauce. From a health and fitness angle, long natural fermentation breaks down heavy starches and gluten proteins, making sourdough significantly easier on human digestion than standard commercial white bread. It provides steady, long lasting energy without causing drastic spikes in your blood sugar, so you can enjoy a comforting slice of rich garlic bread while still feeling vibrant, light, and nourished.
Making your own specialty loaf at home also brings a wonderful sense of personal pride and achievement that simply cannot be bought at a local grocery store. Taking basic ingredients like flour, pure water, salt, garlic, and wild yeast culture and turning them into a magnificent centerpiece is a true form of kitchen art. You have complete creative control over the quality of your ingredients, allowing you to choose organic flours, extra virgin olive oil, real butter, and fresh herbs picked right from your backyard garden or local farmer market. Preparing this bread for family members or dinner party guests shows immense care and hospitality, as warm fresh sourdough creates an inviting atmosphere of comfort and joy. Once you experience the incredible smell, satisfying crunch, and incredible garlic herb flavor of a fresh loaf pulled right from your own hot oven, you will want to return to this reliable recipe time and time again.
Ingredients You Will Need
To make one large sourdough garlic herb loaf, gather these simple high quality ingredients before you start your baking session.
-
Active sourdough starter that is fully bubbly and fed: 100 grams
-
Unbleached bread flour with high protein content: 400 grams
-
Whole wheat flour for rustic flavor and color: 100 grams
-
Warm filtered water at room temperature: 350 grams
-
Fine sea salt or kosher salt: 10 grams
-
Fresh whole heads of garlic for roasting: 2 full heads
-
Extra virgin olive oil for drizzling over garlic: 2 tablespoons
-
Softened unsalted high quality butter: 50 grams
-
Fresh finely chopped rosemary leaves: 1 tablespoon
-
Fresh finely chopped thyme leaves: 1 tablespoon
-
Fresh finely chopped Italian flat leaf parsley: 2 tablespoons
-
Optional grated parmesan cheese for extra savory topping: 30 grams
Step by Step Method
Step 1: Roast the Garlic
Start by heating your kitchen oven to 200 degrees Celsius or 400 degrees Fahrenheit. Take your two whole heads of fresh garlic and peel away the loose papery outer skin layers using your fingers. Use a sharp knife to carefully slice off the top top quarter inch of the garlic heads so that the tips of all the individual cloves are exposed. Place both cut heads upright on a sheet of aluminum foil. Drizzle the tops evenly with two tablespoons of extra virgin olive oil and sprinkle a tiny pinch of salt over them. Wrap the aluminum foil securely around the garlic heads to create a tight sealed packet. Place the packet in your hot oven and bake for roughly forty to forty five minutes until the garlic cloves turn deep golden brown, extremely soft, and sweet. Let the wrapped packet cool down completely on your counter. Once cool, squeeze the roasted soft garlic cloves out of their papery skins into a small bowl, mash them smooth with a fork, and mix them together with your softened butter and chopped herbs. Set this fragrant garlic herb mix aside for later.
Step 2: Mix the Dough and Autolyse
In a large clean glass or plastic mixing bowl, combine 100 grams of active bubbly sourdough starter with 350 grams of warm filtered water. Stir the liquid gently using a wooden spoon or a spatula until the starter is mostly dissolved and the water looks cloudy and milky. Add 400 grams of unbleached bread flour and 100 grams of whole wheat flour into the bowl. Use a strong spoon or your clean hands to mix everything together until all the dry white flour disappears and a shaggy, wet ball of dough forms. Make sure there are no dry flour pockets remaining at the very bottom of your bowl. Cover the bowl loosely with a damp kitchen towel or plastic cover and let the wet dough rest undisturbed on your kitchen counter for 45 minutes. This important resting period is called the autolyse phase, which helps the flour absorb the water completely and allows gluten fibers to start forming naturally without any heavy manual kneading.
Step 3: Add Salt and Perform Stretch and Folds
After the resting period ends, uncover your dough bowl. Sprinkle 10 grams of fine sea salt evenly over the top surface of the wet dough. Wet your hands slightly with clean water so the dough does not stick to your fingers. Reach down under one side of the dough ball, grab a section, gently stretch it upwards towards the ceiling without tearing it, and fold it over the top center of the dough mass. Rotate your mixing bowl ninety degrees and repeat this exact same motion, stretching another side upwards and folding it over the top center. Continue rotating the bowl and folding two more times until you have stretched all four quarters of the dough. Cover the bowl with your wet towel and let it rest for 30 minutes. You will repeat this simple stretch and fold routine every 30 minutes for a total of four rounds over two full hours.
Step 4: Lamination and Adding Garlic Herb Fillings
Thirty minutes after completing your fourth round of stretching and folding, it is time to build layers of incredible flavor inside the dough structure. Lightly mist your clean kitchen countertop with a little water so the soft dough slides easily. Turn your dough out onto the damp counter. Using damp hands, gently stretch the dough outwards from the middle into a large, thin rectangular sheet, taking care not to rip the delicate gluten network. Spread your prepared soft roasted garlic, herb, and butter mixture evenly over the entire surface of the stretched dough. If you are using grated parmesan cheese, sprinkle it evenly over the garlic spread now. Gently fold one third of the dough rectangle over into the middle like a business letter, then fold the opposite third over the top. Roll the long folded strip up from the bottom into a tidy, filled log shape. Transfer this filled dough back into your clean bowl, cover tightly, and let it finish its main fermentation resting on your counter for two to three hours until the dough feels puffy, lighter, and expanded in size by roughly fifty percent.
Step 5: Final Shaping and Cold Proofing
Dust your clean working counter lightly with a little flour. Turn your puffy fermented garlic dough out onto the flour. Gently shape the dough into a smooth round ball by rolling it toward your body using the sides of your hands to create light surface tension on the outer skin. Let the ball rest uncovered on the desk for fifteen minutes to relax the gluten fibers. After this short bench rest, lightly shape it once more to make it firm and round. Dust a dedicated bread proofing basket or a medium bowl lined with a clean cotton towel generously with rice flour or white flour. Pick up your shaped dough round carefully and place it upside down into the lined basket, so the smooth bottom side faces upward toward you. Cover the basket completely with a clean plastic bag or shower cap and place it inside your refrigerator for twelve to eighteen hours for a slow cold fermentation phase. This long cold rest creates deep, complex sourdough flavor while making the dough firm and easy to score.
Step 6: Baking in a Dutch Oven
Place a heavy cast iron Dutch oven with its lid inside your kitchen oven on the middle rack. Turn the heat up to 230 degrees Celsius or 450 degrees Fahrenheit and let the heavy pot preheat completely for one full hour so it gets blazing hot. Remove your chilled loaf basket directly from the refrigerator. Place a sheet of parchment paper over the top of the basket, place a flat baking board over the paper, and invert the basket so the dough lands right on the parchment paper. Rub a tiny bit of flour over the surface of the rounded dough. Use a sharp razor blade or kitchen knife to cut a long, confident slash across the top of the dough to allow steam to escape during baking. Carefully pull the super hot Dutch oven out of your oven using thick heat resistant oven mitts and remove the heavy lid. Pick up the dough by holding the corners of the parchment paper and gently lower it into the bottom of the hot pot.
Step 7: The Bakes and Cooling
Immediately place the heavy lid tightly back onto the Dutch oven to trap all the rising steam inside, which is the secret to getting a great oven spring and crispy top crust. Return the covered pot to your hot oven and bake for twenty minutes with the lid on. After twenty minutes, carefully remove the lid to expose the top of the loaf. Lower your oven temperature slightly to 210 degrees Celsius or 410 degrees Fahrenheit. Continue baking uncovered for another twenty to twenty five minutes until the outer crust turns a gorgeous dark golden bronze color and the exposed herbs look lightly toasted. Carefully lift the hot baked bread out of the Dutch oven using the edges of the parchment paper and place it on a wire cooling rack. Resist the strong temptation to cut into your loaf right away while it is burning hot. Let the bread cool down for at least two full hours before slicing, as the internal structure is still setting its texture and cooking softly from residual heat.
Why This Recipe Is Special
This sourdough garlic herb bread is truly unique because it merges ancient traditional fermentation practices with bold savory restaurant style flavors. Standard modern commercial garlic bread is often made by simply spreading garlic butter over cheap, processed white bread that lacks structure, nutrition, and depth. In stark contrast, this sourdough method builds complex natural flavors right inside the structure of the dough over many hours. The wild yeast and beneficial lactic acid bacteria work together slowly, digesting sugars and releasing subtle tangy acids that balance the natural richness of roasted garlic and creamy butter. The result is a loaf that boasts a complex taste profile, featuring deep savory notes, gentle sourness, and herbal freshness all wrapped in a wonderfully crunchy golden shell.
From a health perspective, long natural sourdough fermentation renders the loaf far easier on human digestive systems compared to standard fast baked yeast breads. During the slow fermentation process, beneficial micro organisms break down complex gluten proteins and phytic acid, which is a naturally occurring compound in grains that can block nutrient absorption in your gut. As phytic acid decreases, your body can absorb essential minerals like iron, zinc, magnesium, and calcium much more efficiently. Furthermore, garlic is famously renowned for its powerful health promoting properties, including natural antibacterial qualities, immune system support, and cardiovascular benefits. Using fresh garden herbs like rosemary and thyme also introduces antioxidants and natural plant compounds into your home diet, proving that wholesome healthy bread can also taste completely delicious and decadent.
Extra Tips for Better Taste
-
Use whole heads of real fresh garlic rather than pre peeled or jarred garlic paste to achieve the sweetest roasted flavor.
-
Swap out standard vegetable oils for extra virgin olive oil or genuine high fat European style butter when mixing your garlic spread.
-
Try adding different fresh garden herbs such as oregano, basil, chives, or sage depending on what season you are baking in.
-
Dust your proofing basket with rice flour instead of normal wheat flour to completely prevent sticky dough from clinging to the towel or basket.
-
Place a couple of ice cubes beneath the parchment paper inside your hot Dutch oven right before closing the lid to create extra high steam for an even crispier top crust.
-
If you enjoy spicy food, sprinkle a few red pepper flakes or crushed dried chili into the garlic butter mix during the lamination step.
-
Always allow your baked sourdough loaf to cool down completely to room temperature on a open wire rack so the interior crumb does not become gummy or sticky when sliced.
Final Thoughts
Baking your own sourdough garlic herb bread at home is a deeply satisfying, joyful journey that rewards your time and patience with an incredible centerpiece loaf. There is nothing quite like the feeling of pulling a crackling, golden brown loaf out of your hot oven, knowing that you built every bit of its incredible flavor from simple natural ingredients. This bread has the marvelous power to bring family and friends together around the dinner table, filling your home with warmth and fantastic comforting scents. Do not worry if your very first attempt is not visually perfect, because every single loaf you bake teaches you more about dough handling and baking craft. Grab your active starter, gather your favorite fresh garden herbs, roast up some sweet garlic, and enjoy every single delightful bite of your delicious homemade creation.
Nutrition Details
Here is the approximate nutritional information for this sourdough garlic herb recipe, calculated for both the whole loaf and a single individual serving based on ten equal slices.
| Nutrients | Amount Per Single Serving | Amount Per Full Loaf |
| Total Calories | 215 kcal | 2150 kcal |
| Carbohydrates | 36 grams | 360 grams |
| Dietary Fiber | 3 grams | 30 grams |
| Sugar Content | 1 gram | 10 grams |
| Total Protein | 7 grams | 70 grams |
| Total Fat | 5 grams | 50 grams |
| Saturated Fat | 2.5 grams | 25 grams |
| Sodium Content | 390 milligrams | 3900 milligrams |
| Potassium | 110 milligrams | 1100 milligrams |
Disclaimer
This recipe and its nutritional information are provided strictly for general educational and cooking enjoyment purposes. Everyone has unique individual dietary needs, digestive capabilities, and health conditions, so actual nutritional results and personal reactions to fermented foods can vary from person to person. If you have severe gluten sensitivities, celiac disease, or specific medical conditions requiring strict dietary restrictions, please consult with a qualified health professional or certified nutritionist before adding new artisanal breads into your regular daily meal plans.