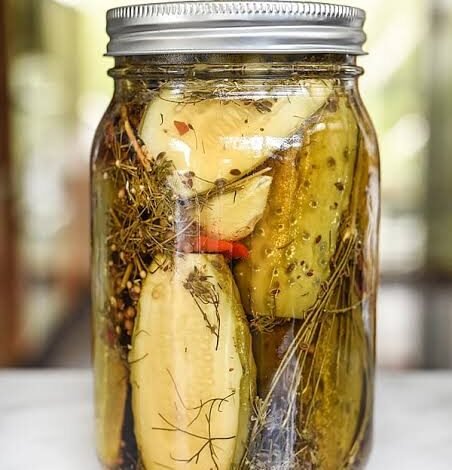
Canning dill pickles at home is one of the most rewarding kitchen traditions you can learn. This recipe is all about taking fresh, crisp garden cucumbers and turning them into tangy, garlicky, crunchy dill pickles that will last on your pantry shelf all year long. Many people feel intimidated by the idea of home canning because they think it takes professional skills or dangerous equipment, but that is simply not true. With just a big pot of boiling water, glass mason jars, fresh herbs, and a balanced vinegar brine, you can make pantry stable pickles that taste far better than anything you can buy at a grocery store. This complete guide walks you through every single part of the process so you feel confident from start to finish. You will learn how to prepare your cucumbers, how to pack your jars with aromatic spices, how to make the perfect brine balance, and how to safely seal your jars using the water bath method.
People love this classic dill pickle recipe because the flavor and texture are unbeatable. Store bought pickles often sit on shelves for months after being treated with chemical preservatives and artificial food colorings that make them soft or overly salty. When you make your own batch at home, you get a clean, sharp, mouthwatering sourness paired with real garlic, whole dill heads, and aromatic pickling spices. Every single bite delivers a loud, satisfying crunch that pickle lovers crave. It connects you to a timeless way of eating where simple ingredients create bold flavors. Families also love this recipe because you can adjust the herbs and spices to match your exact taste, whether you like your pickles heavy on garlic, extra herbal with fresh dill, or with a slight kick of black pepper.
There are so many wonderful reasons to make this recipe, ranging from emotional nostalgia to modern health and fitness goals. On an emotional level, canning pickles often brings back warm memories of grandparents working in busy summer kitchens, filling jars with garden bounties, and stocking the cellar for winter. It feels deeply satisfying to look at a shelf filled with bright green jars that you prepared with your own hands. From a culinary perspective, having homemade pickles ready means you can elevate everyday meals like juicy burgers, grilled sandwiches, potato salads, and charcuterie snack boards at a moment’s notice. It is also an amazing way to use up an overflow of summer cucumbers from your backyard garden or local farmers market before they go soft, saving money while cutting down on household food waste.
For anyone focused on fitness and clean eating, homemade dill pickles are a dream food. They are naturally very low in calories, making them a fantastic crunchy snack when you crave something salty without ruining your healthy daily eating plan. When you make your pickles at home, you control the quality of the salt, water, and vinegar, avoiding high fructose corn syrup and weird additives found in cheap commercial jars. Pickle juice has even become a favorite among athletes for quick hydration and muscle cramp relief because it naturally provides electrolytes. Whether you are preserving your summer harvest, looking for a low calorie crunchy snack, or just want to master a classic kitchen skill, this dill pickle canning recipe will quickly become a household favorite.
Ingredients You Will Need
To make about six to seven one quart jars of crunchy dill pickles, gather the following fresh ingredients and pantry staples:
-
Fresh pickling cucumbers (such as Kirby variety): 8 pounds
-
Distilled white vinegar (5 percent acidity): 4 cups
-
Pure water (filtered or non chlorinated tap water): 4 cups
-
Pure pickling salt or kosher salt without additives: one half cup
-
Fresh dill heads or large sprigs of fresh dill weed: 14 heads or large bunches
-
Fresh garlic cloves, peeled and lightly crushed: 14 whole cloves
-
Whole black peppercorns: 2 tablespoons
-
Whole mustard seeds: 2 tablespoons
-
Red pepper flakes (optional for mild heat): 1 teaspoon
-
Whole bay leaves: 7 dried leaves
-
Pickle crisp granules (calcium chloride, optional for extra crunch): one and three quarters teaspoon total (one quarter teaspoon per jar)
Step by Step Method
Preparing the Cucumbers and Jars
Start by washing your pickling cucumbers thoroughly under cold running water. Use your fingers or a soft vegetable brush to gently remove any garden dirt from the bumpy skin. Inspect each cucumber carefully and set aside any that are soft, bruised, or damaged, because only firm cucumbers make crisp pickles.
Fill a large clean bowl or sink with ice water and soak your cleaned cucumbers for about one hour. This ice bath helps restore natural moisture and guarantees a loud crunch later.
While the cucumbers are chilling in their ice bath, prepare your canning equipment. Wash seven wide mouth quart jars, metal rings, and new flat lids in warm soapy water, then rinse them completely.
Place your large water bath canner on the stove, insert the bottom canning rack, and fill it halfway with clean water. Put your clean jars upright into the canner water and turn the heat to medium low so the jars stay hot. Keeping the jars warm prevents them from cracking when hot brine is poured inside later. Place your flat lids in a small bowl of warm water so their rubber sealing rings soften.
Take the cucumbers out of the ice water and pat them dry with a clean towel. Use a small sharp knife to slice off one sixteenth of an inch from the blossom end of every cucumber. The blossom end contains natural enzymes that can make pickles soft during storage, so trimming it off is a critical secret for lasting crispness. You can leave small cucumbers whole, or slice larger ones into halves, spears, or thick sandwich rounds depending on your preference.
Cooking the Brine
In a large stainless steel saucepan or stockpot, combine four cups of distilled white vinegar, four cups of filtered water, and one half cup of pure pickling salt. Do not use regular table salt because the anti caking agents in it will make your pickle brine look cloudy and dark.
Turn the stove heat to medium high and stir the liquid with a wooden or stainless steel spoon until all the salt dissolves completely. Bring the brine mixture to a rolling boil, then turn the heat down to low so it stays at a gentle simmer while you pack the jars. Keep a lid loosely on the pot so the liquid does not evaporate away.
Packing the Jars
Using a jar lifter tool, carefully remove one hot glass jar from the warm canner and place it onto a clean wooden cutting board or folded kitchen towel on your countertop.
Add the dry spices and aromatics directly into the bottom of the empty hot jar: add two peeled cloves of fresh garlic, two fresh dill heads or sprigs, one teaspoon of whole mustard seeds, one teaspoon of whole black peppercorns, one dried bay leaf, a pinch of red pepper flakes if you enjoy warmth, and one quarter teaspoon of pickle crisp granules.
Begin packing your trimmed cucumbers into the jar tightly. Stand spears or whole cucumbers vertically, pushing them close together so there is very little empty space. Pack them as firmly as possible without crushing them, because cucumbers shrink slightly as they process in hot water. Leave about one half inch of empty space between the top of the cucumbers and the very rim of the glass jar.
Adding the Hot Brine and Sealing
Place a wide mouth canning funnel over the packed jar. Carefully ladle the hot simmering vinegar brine into the jar, pouring it over the cucumbers and spices. Make sure all cucumbers are completely submerged beneath the liquid, while leaving exactly one half inch of empty headspace at the top of the jar rim.
Take a clean wooden skewer or plastic bubble remover tool and gently slide it down along the inside glass walls of the jar. Move it around the cucumbers to release any trapped air bubbles rising from the bottom. If the liquid level drops after removing bubbles, add a small splash of hot brine to bring it back to that one half inch headspace mark.
Dip a clean paper towel into warm water and wipe the top rim and threads of the glass jar clean. Any tiny speck of salt, herb, or liquid left on the rim could stop the lid from making an airtight seal. Center a clean flat lid on top of the jar, then screw a metal band over the lid until it is fingertip tight. Fingertip tight means turning the ring until you feel light resistance, without using your full hand strength to over tighten it.
Processing in the Water Bath
Use your jar lifter to lower the filled jar back into the hot water bath canner. Repeat the packing and filling steps for all remaining jars until your cucumbers and brine are used up.
Once all jars are inside the canner rack, check the water level. The water must cover the tops of the jar lids by at least one to two full inches. If the water level is too low, pour in boiling water from a kettle until the jars are safely submerged.
Place the lid on the water bath canner and turn the stove burner to high. Watch for the water to reach a vigorous, rolling boil. Once the water is boiling hard, start your kitchen timer. Process quart jars in boiling water for fifteen minutes. If you are using pint jars instead, process them for ten minutes. If you live more than one thousand feet above sea level, add extra boiling time according to standard high altitude canning guidelines.
Cooling and Storing
When the processing timer rings, turn off the stove heat completely. Remove the canner lid, turning it away from your face to avoid the hot steam, and let the jars rest undisturbed inside the hot water for five minutes. This resting step lets the pressure equalize inside the jars and prevents liquid from boiling out past the lids.
Using your jar lifter, carefully lift the hot jars straight up out of the canner without tilting them. Place the hot jars onto a thick towel or wooden cooling board in a warm, draft free corner of your kitchen. Leave at least one inch of space between each jar so air can circulate.
Let the jars sit completely still for twelve to twenty four hours. Do not touch, move, or press down on the center of the lids while they are cooling down. As the jars cool, you will hear a wonderful popping sound as each lid seals tightly down.
After twenty four hours, test every seal by pressing the center of each metal lid with your finger. If the lid is concave and does not pop up or flex, the jar is safely sealed. Unscrew the outer metal rings, wipe the outside of the glass jars clean, and label each jar with the date and recipe name. Store your sealed pickle jars in a cool, dark, dry pantry or cupboard. For the best flavor, wait at least three to four weeks before opening your first jar so the cucumbers have time to absorb all the rich garlic, dill, and vinegar notes.
Why This Recipe Is Special
This dill pickle recipe is special because it strikes a perfect harmony between traditional home preservation science and fantastic culinary taste. Many home cooks struggle with soggy pickles, but this recipe includes key techniques like cold water soaking, blossom end trimming, and pickle crisp granules that work together to guarantee an unbeatable crunch in every bite.
From a health standpoint, homemade canned pickles are a wonderful addition to a wholesome lifestyle. They are naturally fat free, gluten free, and extremely low in sugar compared to sweet pickle varieties. Cucumbers are packed with water and valuable plant compounds, while the garlic and fresh dill used in the brine contribute natural antioxidants and essential minerals.
The taste profile is clean, vibrant, and deeply savory. Unlike store bought jars that rely on harsh preservatives, this recipe highlights the true herbal essence of fresh dill weed, the warm earthiness of mustard seeds, the gentle punch of garlic, and the bright acidity of vinegar. It brings incredible restaurant quality flavor straight to your family table.
Extra Tips for Better Taste
-
Always choose fresh pickling cucumbers picked within twenty four hours for the ultimate crispness. Avoid standard long salad cucumbers from supermarket produce sections because their skins are waxed and their seeds contain too much water.
-
If you cannot find fresh dill heads with seeds attached, use generous bunches of fresh baby dill weed along with one extra teaspoon of dry dill seeds in each jar.
-
Add fresh peeled horseradish root pieces to each jar if you love a sharp, sinus clearing punch similar to deli style pickles.
-
Use pure filtered spring water instead of city tap water, because heavy minerals and chlorine in tap water can weaken the crispness and discolor your garlic cloves.
-
If you notice your garlic turning slightly blue or green inside the jar after processing, do not worry. This natural reaction between garlic enzymes and vinegar acid is completely harmless and safe to eat.
-
For people who love sweet heat, add one thin slice of fresh jalapeno pepper and one teaspoon of organic cane sugar into the bottom of each jar before packing.
-
Always chill your jar of pickles in the refrigerator for twenty four hours before eating your first spear, because cold temperatures make the crunch even more pronounced.
Final Thoughts
Making your own canned dill pickles is a joyful, satisfying kitchen adventure that fills your home with comforting aromas and your pantry with bright, beautiful jars. Once you taste the fresh crunch, fragrant dill, and punchy garlic of homemade pickles, you will never want to go back to store bought brands again. It is a wonderful project to share with kids, family members, or friends on a sunny weekend, and a jar of homemade pickles makes a lovely, thoughtful gift for neighbors. Take your time, follow each safe canning step with care, and enjoy the delicious rewards of your kitchen craft for many months to come.
Nutrition Details
The table below shows the estimated nutrition breakdown for this homemade dill pickle recipe, including the overall batch values and the nutrition per standard single serving (about one spear or thirty grams).
| Nutrient | Amount Per Single Serving (1 spear) | Amount Per Entire Recipe Batch (7 Quarts) |
| Calories | 5 kcal | 280 kcal |
| Total Fat | 0 grams | 1 gram |
| Saturated Fat | 0 grams | 0 grams |
| Trans Fat | 0 grams | 0 grams |
| Cholesterol | 0 milligrams | 0 milligrams |
| Sodium | 240 milligrams | 13440 milligrams |
| Total Carbohydrates | 1 gram | 58 grams |
| Dietary Fiber | 0.4 grams | 22 grams |
| Total Sugars | 0.5 grams | 28 grams |
| Added Sugars | 0 grams | 0 grams |
| Protein | 0.3 grams | 16 grams |
| Calcium | 15 milligrams | 840 milligrams |
| Iron | 0.2 milligrams | 11 milligrams |
| Potassium | 45 milligrams | 2520 milligrams |
Disclaimer
This recipe and nutritional guide are provided for educational and culinary enjoyment purposes only. Every person has unique dietary needs, health conditions, and sodium tolerances, so individual nutritional results may change based on specific ingredient brands, cucumber sizes, and eating habits. If you have high blood pressure, kidney concerns, or are following a strict low sodium diet, speak with your doctor or a qualified healthcare professional before adding high salt preserved foods to your daily meal plan. Always follow tested food safety and water bath canning guidelines to ensure your home preserves remain safe and wholesome.






2 Comments