Sourdough baking has captured the hearts of home bakers all over the world because it brings a wonderful sense of tradition back into our modern kitchens. When you keep a sourdough starter alive in your home, you quickly realize that you end up with a lot of leftover starter every time you feed it. Many people feel sad throwing that extra mixture into the trash because it feels like a waste of good flour and water. That is exactly why this amazing sourdough discard loaf pan bread recipe was created for practical home cooks. This special recipe allows you to transform that extra starter into a soft, golden, and delicious loaf of sandwich bread without any hassle at all. Instead of waiting for days to get a single loaf, this recipe uses your extra starter to build amazing flavor while giving you a reliable bake every single time you make it.
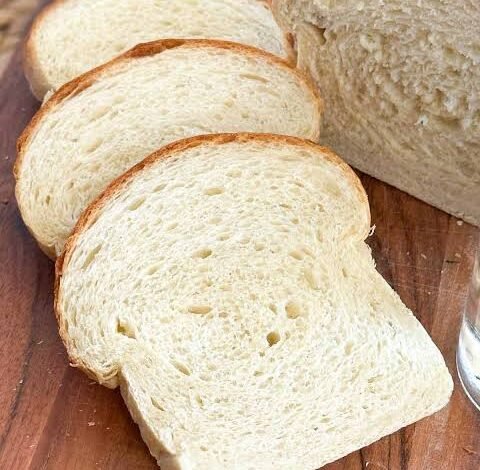
People love this recipe because it combines the best parts of ancient bread making with the total ease of modern kitchen baking. Standard sourdough can sometimes be very tricky, requiring hours of folding, shaping, and waiting for the dough to rise in fancy baskets. This loaf pan version takes away all that stress because the metal pan holds the shape of your dough perfectly while it bakes. You get that signature tangy taste that makes sourdough so special, but the crumb inside stays soft, fluffy, and completely perfect for making everyday sandwiches. Kids and adults alike enjoy this bread because it is gentle on the teeth, easy to slice, and never too hard or chewy. It gives you all the warm, cozy feelings of fresh homemade bread without demanding that you act like a master professional baker all morning long.
There are so many wonderful emotional and physical reasons to make this tasty bread in your own home kitchen. Baking bread is a deep, comforting activity that helps you slow down, breathe, and unwind after a busy, stressful week at work. The warm, rich smell of fresh bread filling your home brings an instant feeling of peace, happiness, and simple warmth to everyone in the family. From a health and fitness view, making your own bread lets you take complete control over every single ingredient that goes into your body. Store bought loaf bread is often packed with strange preservatives, hidden sugars, extra chemicals, and unnatural oils that your body does not really need. When you bake this at home, you use simple, clean ingredients that nourish your family and make you feel proud of what you put on the dinner table.
If you are looking for a reliable, tasty, and deeply satisfying way to use up your extra starter, this sandwich loaf will quickly become a favorite staple in your weekly routine. It fits seamlessly into a busy family schedule because you can easily mix the dough in the evening, let it rise, and have fresh warm slices ready for breakfast the next morning. Toasting a slice of this fresh bread in the morning and spreading a little cream butter over the warm top is one of the ultimate simple pleasures in life. You will love how easy it is to slice smoothly for lunch sandwiches without the whole loaf crumbling apart on your cutting board. It is honest food made with love, zero waste, and standard kitchen ingredients that anyone can master on their very first attempt.
Ingredients You Will Need
To make one full size, delicious loaf of sourdough discard sandwich bread, gather these simple ingredients together on your kitchen counter:
-
1 cup (240 grams) sourdough discard, unfed and brought to room temperature
-
3 and 1/2 cups (420 grams) all purpose flour or unbleached bread flour
-
1 cup (240 milliliters) warm whole milk, around 105 degrees Fahrenheit
-
2 tablespoons (28 grams) unsalted butter, melted and allowed to cool slightly
-
2 tablespoons (42 grams) pure honey or granulated white sugar
-
2 teaspoons (7 grams) active dry yeast or instant yeast
-
1 and 1/2 teaspoons (9 grams) fine sea salt or table salt
-
1 tablespoon (14 milliliters) neutral vegetable oil or olive oil, for greasing your bowl and pan
Step by Step Method
Step 1: Prepare Your Wet Mixture
Start by warming your whole milk in a small pot or in the microwave until it feels comfortably warm to the touch. It should feel like warm bathwater, warm enough to activate the yeast but not hot enough to hurt it. Pour the warm milk into a large glass mixing bowl or the bowl of your stand mixer. Add the honey or sugar along with the active dry yeast directly into the warm milk. Stir gently with a spoon and let the mixture sit peacefully for about five to ten minutes. You will know it is ready when a creamy, bubbly foam forms on top of the liquid. Once you see that foam, pour in your room temperature sourdough discard along with the melted butter. Whisk everything together until the liquid looks smooth, uniform, and completely combined.
Step 2: Mix the Dough
Add your flour and the fine sea salt directly into the liquid mixture in the bowl. If you are using a stand mixer, attach the dough hook and turn the machine on to a low speed setting. If you are mixing by hand, use a strong wooden spoon to bring the dry flour and wet ingredients together until a shaggy, messy ball forms. Once the flour is mostly incorporated, let the dough rest for about five minutes in the bowl. This brief pause allows the flour to absorb the wet ingredients fully, which makes kneading much easier later on.
Step 3: Knead Until Smooth
Now it is time to knead the dough to build structure and strength. If using a stand mixer, keep the speed on medium low and let the hook work the dough for about six to eight minutes. If kneading by hand, lightly dust a clean kitchen counter with flour, turn the dough out, and work it with the palms of your hands. Push the dough forward, fold it back over itself, turn it slightly, and repeat. Continue this rhythmic movement for about eight to ten minutes. The dough will transform from a sticky, bumpy mass into a soft, smooth, stretchy ball that bounces back gently when you poke it with your finger.
Step 4: First Rise
Lightly coat the inside of a large, clean glass bowl with a teaspoon of neutral oil. Place your kneaded dough ball inside the greased bowl and turn it over once so the entire surface gets lightly coated in oil. Cover the top of the bowl tightly with plastic wrap or a damp cotton kitchen towel. Place the bowl in a warm, draft free area of your home, such as inside an oven that is turned off with the oven light switched on. Let the dough rise undisturbed for about one to one and a half hours, or until it doubles in physical size.
Step 5: Shape the Loaf
Once the dough has doubled, gently press your fist into the center to release the trapped air bubbles. Lightly oil your hands and turn the dough out onto a clean, unfloured work surface. Use your hands to flatten the dough out into a rough rectangle shape that is about eight inches wide and twelve inches long. Roll the dough up tightly from the short edge, building tension as you roll it into a neat log. Pinch the bottom seam firmly with your fingers to seal it closed, and tuck the side edges under so you have a tidy, smooth loaf shape.
Step 6: Second Rise in the Pan
Take a standard eight by four inch metal loaf pan and grease the bottom and sides thoroughly with butter or cooking spray. Place your shaped dough log seam side down into the center of the greased pan. Cover the loaf pan loosely with a clean towel or a piece of lightly greased plastic wrap. Set the pan back in a warm spot to rise a second time for about forty five minutes to one hour. The dough is ready to bake when it has risen about one inch above the rim of the loaf pan and looks crown shaped on top.
Step 7: Bake to Golden Perfection
While your dough finishes its second rise, preheat your main kitchen oven to 375 degrees Fahrenheit (190 degrees Celsius). Once the oven is fully preheated, uncover your loaf pan very carefully so you do not deflate the soft dough. Place the pan directly on the middle rack of your oven. Bake for thirty to thirty five minutes. The top of the bread will turn a rich, golden brown color. To test if it is done, tap the top crust gently; it should sound hollow. You can also insert a digital thermometer into the center, which should read around 190 to 200 degrees Fahrenheit.
Step 8: Cool and Slice
Carefully remove the hot loaf pan from the oven using thick oven mitts. Let the bread sit inside the pan on a wire cooling rack for about ten minutes to set. After ten minutes, gently turn the pan sideways and slide the loaf out onto the wire rack. Brush the warm top crust with a tiny bit of extra butter if you want a soft, shiny crust. Allow the bread to cool down completely to room temperature before you try to slice it. Slicing warm bread can squeeze the inside and make it gummy, so patience gives you the best texture.
Why This Recipe Is Special
This sourdough discard loaf pan bread stands out from standard bread recipes in many incredible ways. First, it solves a major food waste problem in the kitchen by using up the starter discard you would otherwise toss away. Beyond saving money, using discard adds a gentle, fermented richness to the flavor profile that regular yeast alone simply cannot replicate. The bread carries a subtle sour tang that pairs beautifully with sweet toppings like strawberry jam as well as savory fillings like roasted turkey, cheddar cheese, and crispy bacon.
From a wellness standpoint, adding sourdough discard to your bread dough introduces beneficial fermented grain properties. Even though we add active dry yeast to help the dough rise quickly, the long fermented flour in the discard helps soften the overall grain structure. Many people who feel heavy or bloated after eating normal commercial white bread find that homemade discard bread is much easier on their digestive systems. It feels lighter in the stomach while keeping you full and satisfied for hours.
Another reason this recipe is special is its ultimate reliability for busy everyday life. Traditional artisan sourdough requires precise temperature control, endless stretch and folds, and unpredictable timing that can span over two full days. This recipe gives you the comfort of a fast, predictable rise thanks to the added yeast, while still delivering that gourmet bakery flavor. It fits your busy real world routine while giving you a loaf that looks like it came straight out of a cozy local bakery shop.
Extra Tips for Better Taste
-
Swap Whole Milk for Buttermilk: For an even richer taste and extra tender crumb, replace the regular whole milk with rich cultured buttermilk. The extra acid makes the interior super soft.
-
Add Whole Seeds: Sprinkle toasted sesame seeds, sunflower seeds, or poppy seeds over the top of the loaf right before baking. Brush the dough with a little water first so the seeds stick tightly.
-
Use Honey for Warmth: Using natural honey instead of white sugar brings a soft, floral sweetness that balances the natural sour note of your starter discard wonderfully.
-
Try Herb Butter Brushing: Melt two tablespoons of butter with dried oregano, garlic powder, and parsley, then brush it over the hot loaf right as it comes out of the oven for an amazing garlic bread vibe.
-
Store It Right: Keep your completely cooled loaf in a linen bread bag or a loose paper bag for the first two days to keep the crust soft. For longer storage, slice the loaf completely and freeze the slices in a zip top bag. You can pull out individual slices and toast them straight from frozen whenever you want fresh bread.
Final Thoughts
Baking your own fresh bread at home is one of the most rewarding kitchen skills you can ever learn, and this sourdough discard loaf pan bread is the absolute perfect place to start. It takes the mystery out of sourdough baking, stops kitchen waste in its tracks, and fills your house with a warm, welcoming aroma that brings everyone straight to the kitchen table. Whether you are making morning toast with honey, packing lunches for school, or serving warm slices alongside a bowl of hot soup, this reliable loaf will never let you down. Give your kitchen discard new life today, enjoy the fun process of kneading, and take pride in serving your family wholesome, delicious, home baked bread.
Nutrition Details
Here is the approximate nutritional breakdown for this homemade loaf. Keep in mind that exact numbers can shift slightly depending on the exact brands of flour, butter, and sweet milk you choose to use in your kitchen.
Recipe Yield Summary
-
Total Recipe Prep Time: 20 minutes
-
Total Rise Time: 2 hours 15 minutes
-
Bake Time: 35 minutes
-
Total Servings: 12 slices
Nutrition Table Per Serving
| Nutrient Name | Amount Per Slice | Daily Value Percentage |
| Calories | 175 kcal | 9% |
| Total Fat | 3.5 grams | 5% |
| Saturated Fat | 1.8 grams | 9% |
| Trans Fat | 0 grams | 0% |
| Cholesterol | 7 milligrams | 2% |
| Sodium | 290 milligrams | 13% |
| Total Carbohydrates | 30 grams | 11% |
| Dietary Fiber | 1.2 grams | 4% |
| Total Sugars | 3 grams | 6% |
| Protein | 5 grams | 10% |
| Calcium | 35 milligrams | 3% |
| Iron | 1.8 milligrams | 10% |
| Potassium | 65 milligrams | 2% |
Disclaimer
This recipe and the nutritional information provided are meant for general educational, cooking, and entertainment purposes only. Everyone’s individual body works differently, and dietary needs vary from person to person. Actual nutrition values can change depending on your specific ingredients, exact portion sizes, and preparation methods. If you have specific food allergies, gluten sensitivities, or medical conditions, please consult with a qualified doctor or certified nutritionist before changing your diet.