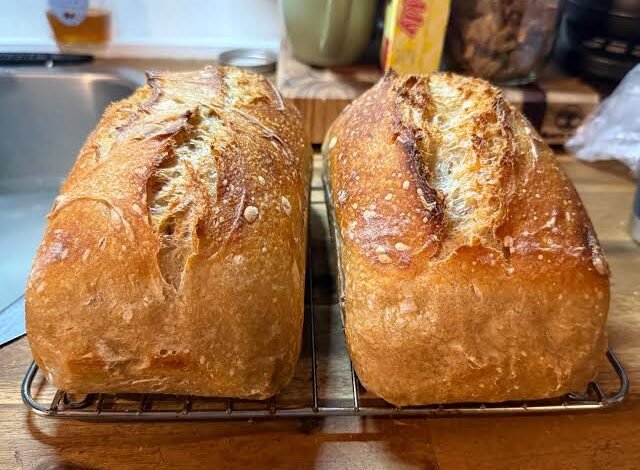
Baking fresh sourdough bread at home can often feel like a complicated science project that requires expensive kitchen gear, but this incredible recipe turns that entire idea upside down. Today we are talking all about making delicious homemade sourdough bread using your leftover sourdough discard and a clever technique called the double loaf pan method. Sourdough discard is the unfed portion of sourdough starter that home bakers usually throw away or save in the refrigerator during their regular feeding routine. Instead of wasting that precious culture, you can easily use it to bake soft, fluffy, and deeply flavorful loaves of bread right inside your everyday kitchen. The double loaf pan technique is a brilliant baking trick where you place one standard rectangular loaf pan upside down on top of another loaf pan to trap natural steam while the bread bakes inside your hot oven. This simple trick mimics expensive commercial steam ovens and heavy cast iron Dutch ovens, giving your bread a crispy golden crust while keeping the inside crumb amazingly tender and soft. Anyone can master this baking style even if they have never baked a single loaf of yeast bread before in their whole life. By blending the ancient tradition of sourdough fermentation with simple household baking pans, this method makes homemade bread accessible, fun, and extremely rewarding for every home cook.
People absolutely love this bread recipe because it solves two major problems that almost every beginner home baker runs into when starting their sourdough journey. First, nobody likes throwing away good food, and using sourdough discard means you are reducing kitchen waste while creating something genuinely delicious for your family to enjoy. Second, many sourdough recipes require heavy, costly Dutch ovens or specialized round proofing baskets that take up tons of space in small kitchen cabinets. This smart double loaf pan approach uses standard loaf tins that most people already have lying around in their kitchen cupboards for baking banana bread or meatloaf. Home bakers also fall in love with the incredible crust and texture that this steam trapped technique consistently delivers without any complicated setup. The closed environment created by two metal pans traps moisture evaporating from the wet dough, which keeps the outer skin soft enough to expand fully during the initial baking phase. This results in a towering rise, a light airy middle, and a golden outer layer that crackles delightfully when you cut into it with a sharp serrated knife. Beyond the technical benefits, people adore the cozy, mouthwatering aroma that fills every single room of the house while the bread bakes in the oven.
You might wonder when is the best time to bake this wonderful double loaf pan sourdough bread, and the true answer is that it fits perfectly into almost any lifestyle or personal routine. From an emotional perspective, baking bread by hand is a deeply calming and mindful activity that helps you slow down after a long and stressful week at work. Kneading and shaping dough with your hands brings a sense of joyful accomplishment that you simply cannot buy at a commercial grocery store. From a taste perspective, sourdough discard provides a rich, complex, tangy flavor profile that ordinary store bought white bread completely lacks, making your morning toast or lunch sandwiches taste like high end restaurant meals. From a fitness and health perspective, long fermented sourdough is much gentler on the digestive system because natural microbes break down complex starches and gluten proteins before you even take a bite. This means many people who feel bloated after eating regular factory made bread find that they can enjoy sourdough without any uncomfortable stomach issues at all. Whether you want a nourishing loaf for your healthy weekly meal prep, a rustic gift to bring to a cozy neighborly gathering, or just a fun weekend activity with your kids, this recipe fills your soul and your stomach in the most comforting way possible.
Preparing your kitchen for this baking journey is very simple and requires no specialized professional training or hard to find ingredients. All you truly need is some active or discarded sourdough starter, basic baking flour, water, salt, and a tiny bit of instant yeast or honey if you want to speed up the rise time naturally. The double loaf pan method creates a perfectly uniform rectangular shape, which is ideal if you love slicing bread for morning sandwiches, garlic toast, or French toast slices. Traditional round sourdough boules can be tricky to slice into equal pieces, but a loaf pan ensures every single slice is uniform, neat, and sturdy enough to hold your favorite fillings. Once you try baking sourdough discard bread with this inverted pan steam technique, you will likely never want to go back to buying soft packaged loaves from the store again. The process is easy to fit into a flexible weekend schedule, allowing you to mix the dough in the morning, let it rise while you do chores, and bake it right in time for dinner. Let us dive right into the complete list of ingredients and step by step directions so you can start baking your very own golden loaf today.
Ingredients You Will Need
To make one large sandwich loaf using the double loaf pan method, gather these simple pantry ingredients. Measurements are provided in both cups and metric weights so you can use whatever tools you feel most comfortable with in your kitchen.
-
Sourdough Discard: 1 cup (240 grams). You can use discard directly from your refrigerator or at room temperature. It does not need to be freshly fed or bubbling.
-
Warm Water: 1 cup plus 2 tablespoons (270 milliliters). The water should feel comfortably warm to the touch, ideally around 95 degrees Fahrenheit or 35 degrees Celsius. Avoid hot water because extreme heat can kill natural wild yeast.
-
Bread Flour or All Purpose Flour: 3 cups plus 2 tablespoons (400 grams). Bread flour yields a slightly chewier texture and higher rise, but standard unbleached all purpose flour works wonderfully too.
-
Instant Yeast or Active Dry Yeast: 1 teaspoon (3 grams). Adding a small pinch of commercial yeast helps your discard dough rise predictably, making this recipe foolproof for busy beginners.
-
Fine Sea Salt or Table Salt: 1.5 teaspoons (9 grams). Salt enhances flavor and regulates yeast activity so your bread rises evenly.
-
Honey or Maple Syrup: 1 tablespoon (21 grams). A touch of natural sweetener feeds the yeast and balances the tangy flavor of the sourdough discard.
-
Unsalted Butter or Olive Oil: 2 tablespoons (28 grams), melted and allowed to cool slightly. Soft fats add tenderness to the bread crumb and help the loaf stay soft for days.
-
Extra Oil or Cooking Spray: 1 tablespoon for greasing your baking pans so the bread releases effortlessly.
Step by Step Method
Follow these plain and simple instructions to create your homemade sourdough loaf. Take your time, enjoy the process, and watch how simple ingredients transform into beautiful golden bread.
Step 1: Mixing the Liquid Base
Start by taking a large mixing bowl. Pour in 1 cup plus 2 tablespoons of warm water. Add 1 tablespoon of honey or maple syrup to the water and stir gently with a spoon until dissolved. Next, measure out 1 cup of sourdough discard and add it into the bowl. Pour in 2 tablespoons of melted unsalted butter or olive oil. Use a whisk or fork to mix these liquid ingredients together until the sourdough discard loosens up and blends into a milky fluid. If you are using active dry yeast instead of instant yeast, sprinkle 1 teaspoon of yeast over this liquid mixture now and let it sit for 5 minutes until small bubbles appear on the surface.
Step 2: Combining the Dry Ingredients
In a separate medium bowl, whisk together 3 cups plus 2 tablespoons of flour and 1.5 teaspoons of fine sea salt. Whisking ensures the salt spreads evenly throughout the flour so there are no salty clumps in your final dough. If you are using instant yeast instead of active dry yeast, stir the instant yeast into the flour mixture right now.
Step 3: Bringing the Dough Together
Dump the flour mixture into the bowl with your wet liquid mixture. Use a sturdy wooden spoon or a silicone spatula to stir everything together. Continue stirring until all the dry flour is absorbed and a shaggy dough forms. If the dough looks overly dry with visible patches of raw flour, add 1 extra tablespoon of warm water. If the dough feels sticky like pancake batter, sprinkle in 1 extra tablespoon of flour. Cover the bowl with a clean kitchen towel and let it rest undisturbed on your kitchen counter for 15 minutes. This brief rest period is called autolyse, and it allows the flour to fully hydrate, making the dough much easier to knead.
Step 4: Kneading the Dough
After resting, turn the dough out onto a clean, lightly floured kitchen surface. Knead the dough gently for about 8 to 10 minutes. To knead, push the heel of your palm into the center of the dough, fold the top half back over itself, turn the dough a quarter turn, and repeat. Continue this rhythmic motion until the dough transforms from a rough, sticky mass into a smooth, elastic, and supple ball. You can test if the dough is kneaded enough by gently poking it with your finger. If the dent bounces back slowly, your dough is ready. If you prefer using a stand mixer fitted with a dough hook attachment, knead on low speed for 5 to 7 minutes until the dough clears the sides of the bowl.
Step 5: The First Rise (Bulk Fermentation)
Lightly coat the inside of your large mixing bowl with a few drops of olive oil or cooking spray. Place your kneaded dough ball back into the oiled bowl, turning it once so the top of the ball gets lightly coated in oil. Cover the bowl tightly with plastic wrap or a damp kitchen towel to prevent the dough skin from drying out. Place the bowl in a warm, draft free spot in your home, such as inside an turned off oven with the oven light switched on. Let the dough rise for about 1 to 2 hours, or until it doubles in physical size. Rising time will vary depending on how warm your home is.
Step 6: Preparing the Double Loaf Pans
While your dough rises, prepare your double loaf pan equipment. You will need two standard metal loaf pans measuring roughly 8.5 by 4.5 inches or 9 by 5 inches. Ensure both pans are completely clean and dry. Lightly coat the inside surfaces of both loaf pans with oil or nonstick cooking spray. For extra protection against sticking, you can line the bottom and long sides of one pan with a strip of parchment paper, leaving small wings hanging over the edges to help lift the baked loaf out later. The second loaf pan will serve as the top dome lid, so grease its interior well too.
Step 7: Shaping the Sandwich Loaf
Once your dough has doubled in size, gently press your fist into the center of the dough to release trapped gas bubbles. Transfer the dough onto a lightly floured surface. Flatten the dough gently with your hands into a flat rectangle roughly 8 inches wide and 12 inches long. Roll the rectangle up tightly starting from the short edge near you, creating a snug cylinder. Pinch the final seam tightly with your fingers to seal the roll. Tuck the outer ends underneath slightly so you have a neat, uniform log shape that matches the length of your metal loaf pan. Place the shaped dough log seam side down into your greased bottom loaf pan.
Step 8: The Second Rise
Cover the loaf pan loosely with a clean kitchen towel or an inverted large plastic container. Let the shaped loaf rise in a warm spot for about 45 minutes to 1.5 hours. The loaf is ready for baking when the crown of the dough rises roughly 1 inch above the top rim of the loaf pan. If you press the side of the dough lightly with a knuckle, it should leave a small indentation that slowly springs back halfway.
Step 9: Setting Up the Oven and Scoring
About 20 minutes before your second rise is finished, preheat your oven to 425 degrees Fahrenheit (220 degrees Celsius). Position an oven rack in the lower middle slot so there is plenty of vertical clearance for two stacked loaf pans. Once the dough has fully risen, take a very sharp kitchen knife or a baker blade lamel. Hold the knife at a slight angle and make one swift slash down the center length of the loaf about half an inch deep. Scoring creates a controlled escape path for steam, allowing your bread to expand upward without tearing randomly at the sides.
Step 10: The Double Loaf Pan Baking Process
Immediately after scoring the dough, take your second greased loaf pan and invert it upside down over the bottom loaf pan containing your bread dough. The rims of both pans should meet neatly, creating an enclosed metal box or capsule. Place this stacked double loaf pan setup directly into your preheated oven on the middle rack. Bake enclosed for 20 minutes at 425 degrees Fahrenheit (220 degrees Celsius). During these first 20 minutes, steam rising out of the baking dough gets trapped inside the inverted top pan. This steam environment keeps the outer crust moist, allowing maximum oven spring expansion while gelatinizing starches on the surface to create a glossy, crispy crust.
Step 11: Uncovering and Finishing the Bake
Carefully open your oven door using heat resistant oven mitts. Gently lift off the top inverted loaf pan and set it aside. You will see a tall, pale, fully expanded loaf of bread inside the bottom pan. Reduce your oven temperature slightly to 375 degrees Fahrenheit (190 degrees Celsius). Continue baking the uncovered loaf for an additional 15 to 20 minutes, or until the top crust turns a deep golden chestnut color. To confirm your bread is fully baked, tap the top crust gently with your knuckle. It should sound hollow. If you have an instant read digital thermometer, insert it into the center of the loaf; the internal temperature should register between 200 and 205 degrees Fahrenheit (93 to 96 degrees Celsius).
Step 12: Cooling and Slicing
Remove the loaf pan safely from the oven using oven mitts. Let the bread sit inside the pan for 5 minutes so the outer crust cools slightly and releases from the pan sides. Next, carefully turn the pan sideways and slide the golden loaf out onto a wire cooling rack. Stand the bread upright and allow it to cool completely to room temperature for at least 1 to 2 hours before slicing. Slicing warm bread is tempting, but cutting too early traps steam inside, making the crumb sticky and gummy. Once cool, slice into clean, beautiful sandwich slices using a sharp serrated bread knife.
Why This Recipe Is Special
This double loaf pan sourdough discard method stands out as one of the most rewarding home baking techniques you can learn. Here are the primary reasons why this recipe earns a permanent spot in your weekly kitchen meal planning.
Clever Steam Trapping Without Expensive Equipment
Traditional artisan sourdough recipes call for heavy cast iron Dutch ovens that weigh a lot and can cost a significant amount of money. A Dutch oven traps steam perfectly, but its round shape creates round boules that are difficult to slice evenly for everyday sandwich school lunches. The double loaf pan method gives you the exact same professional steam effect using inexpensive rectangular pans that sit easily in any cabinet. By clapping two loaf pans together, you create a tiny home steam chamber. The steam prevents the upper crust from setting prematurely, allowing your bread dough to reach its highest possible expansion potential before browning begins.
Reduces Kitchen Food Waste
If you keep a living sourdough starter at home, you know how quickly sourdough discard accumulates in your refrigerator during weekly feedings. Throwing discard down the kitchen drain is wasteful and can eventually clog household plumbing. This recipe turns leftover discard into rich, nourishing food. Even though this quick recipe uses a small pinch of yeast to speed up the rise, the sourdough discard infuses the dough with fantastic fermented flavor, natural acids, and valuable micronutrients, ensuring nothing goes to waste in your kitchen.
Exceptional Digestive Benefits
Longer fermented dough containing real sourdough starter is widely recognized as being much easier on human digestion than standard commercial white bread. Sourdough discard carries natural lactic acid bacteria that help break down phytic acid, an anti nutrient present in wheat flour that can block mineral absorption. Furthermore, the fermentation process begins breaking down complex gluten proteins ahead of time. Many individuals who feel bloated or sluggish after consuming regular store bought loaves report feeling light and energetic after enjoying home baked sourdough discard bread.
Unbeatable Texture and Sliceability
Baking inside a loaf pan creates straight, tall side walls that yield perfectly square or rectangular sandwich slices. Store bought packaged bread often relies on chemical dough conditioners and preservatives to achieve a soft crumb, but this natural double loaf pan steam method achieves a soft, pillow like crumb inside alongside a delightfully thin, crispy outer crust naturally. Every slice holds up beautifully when spread with cold butter, packed with meat and cheese, or toasted for breakfast.
Extra Tips for Better Taste
Want to upgrade your sourdough discard bread to absolute perfection? Try these creative and easy adjustments to elevate the flavor, texture, and appearance of your double loaf.
-
Butter the Upper Pan: Spraying or buttering the interior of the upper inverted loaf pan ensures that even if your dough rises extremely tall and touches the ceiling of the top pan, it will not stick or tear when you remove the cover halfway through baking.
-
Add Whole Seeds for Crunch: Right before scoring your risen loaf, lightly brush the top surface of the dough with a little water or egg wash. Sprinkle a generous layer of sesame seeds, poppy seeds, rolled oats, or sunflower seeds over the top. The steam inside the double pan will lock the seeds into the top crust without burning them.
-
Garlic and Herb Infusion: Mix 1 teaspoon of dried garlic powder, 1 teaspoon of dried rosemary, and 1 teaspoon of dried thyme into your dry flour mixture during step two. Your kitchen will smell like an Italian bakery while the double loaf bakes.
-
Cheesy Crust Upgrade: During the final 5 minutes of baking after removing the top pan cover, sprinkle half a cup of shredded sharp cheddar cheese or grated parmesan over the top of the bread. Let it melt into a bubbling, crispy cheese crown.
-
Use Quality Water: Chlorine found in standard city tap water can sometimes slow down yeast activity. For the absolute best rise, use filtered water or well water warmed slightly in your microwave.
-
Practice Cold Fermentation: If you want an even stronger tangy sourdough flavor, place your shaped loaf pan inside the refrigerator overnight for 12 to 18 hours instead of doing the second rise on the counter. Take it straight out of the fridge, score it, cover with your second pan, and bake directly in your preheated oven.
Final Thoughts
Baking your own bread at home should be a joyful, stress free experience that brings comfort and warmth into your daily life. The double loaf pan sourdough discard method takes all the intimidation out of baking artisan quality bread, turning simple pantry staples into a tall, golden loaf with a crispy crust and tender middle. By reusing sourdough discard and harnessing the smart power of stacked loaf pans, you get bakery quality results using basic equipment you already own. Give this straightforward recipe a try this weekend, enjoy the unbelievable smells drifting from your oven, and savor every delicious slice with your family and friends.
Nutrition Details
Here is an estimated nutritional breakdown for this sourdough discard loaf based on standard ingredients. This recipe yields one standard size sandwich loaf, which cuts neatly into 12 even slices. The values listed below represent the nutritional content per single slice of bread.
| Nutritional Component | Amount Per Slice |
| Calories | 145 kcal |
| Total Fat | 2.5 grams |
| Saturated Fat | 1.0 gram |
| Sodium | 290 milligrams |
| Total Carbohydrates | 25 grams |
| Dietary Fiber | 1.2 grams |
| Sugars | 1.5 grams |
| Protein | 4.5 grams |
| Iron | 1.2 milligrams |
| Calcium | 12 milligrams |
Please keep in mind that exact nutrition totals will naturally vary based on the specific brand of flour, sweetener, and fat you choose to use in your personal kitchen setup.
Disclaimer
This article and recipe are provided strictly for general informational, educational, and culinary enjoyment purposes. Everyone’s body, metabolic health, and nutritional requirements are uniquely different, meaning individual dietary responses and health outcomes will vary from person to person. If you have specific medical conditions, gluten sensitivities, celiac disease, or personal health goals, please consult with a qualified doctor or certified clinical nutritionist before making significant changes to your daily diet. Always ensure kitchen food safety guidelines are followed when preparing and storing fresh food products.